Print #12 — The rotating spice rack: round objects, real challenges
Title: Print #12 — The Rotating Spice Rack: Round Objects, Real Challenges
Cylinders look simple. They're a circle extruded upward. How complicated can it be?
Printing them well? More complicated than you think.
A rotating spice rack is the perfect project to confront the real physics of FDM printing on round forms — and to discover one of the most satisfying tricks in the maker toolbox: print-in-place mechanisms.
The problem with tall cylindrical prints: When you print a cylinder, each layer is a closed loop of plastic. As the print gets taller, a few things happen:
- The nozzle revisits the same seam point on every layer, creating a visible vertical seam line
- Thermal stress accumulates — tall, thin cylinders can warp or bow
- Layer adhesion is tested more on curved surfaces where the next layer deposits on a small cross-section
Seam management: Your slicer puts the seam (where each layer starts and stops) in one spot. By default, it usually picks a random spot or the same spot, creating a visible vertical stripe. Solutions:
- Set seam position to "rear" or "aligned" for a single consistent stripe (easier to hide or sand)
- Use the "random" setting for an imperceptibly distributed seam on organic shapes
- For a spice rack, "aligned/rear" is fine — it faces the back
Layer adhesion on round forms: Cylindrical prints have thinner cross-sections at each layer compared to flat objects. This means layers bond over a smaller area. For a spice rack that will spin and hold jars, keep walls at 3–4 perimeters. The spinning base (turntable part) should be at 40% infill for rigidity.
Two approaches to the rotation mechanism:
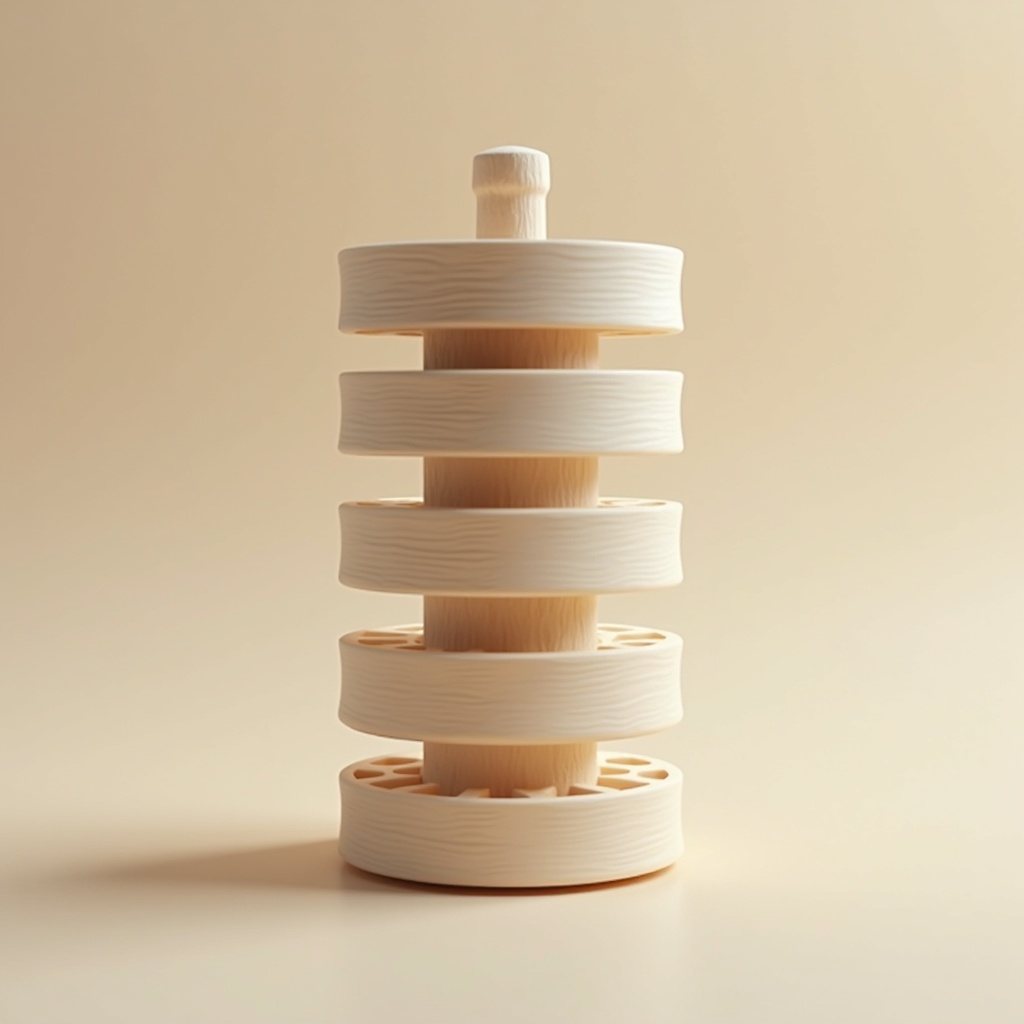
Option 1 — Print-in-place: The model is designed so the upper rack and lower base are printed as one piece with a tiny gap between them. When the print finishes, you work the two pieces loose (rotate them back and forth) and the mechanism "unlocks." No assembly. No ball bearings. Pure FDM magic.
- Gap needed: 0.3–0.4mm between rotating parts
- Works best with a slow, accurate printer
- First few rotations feel stiff — that's normal, it breaks in
Option 2 — With ball bearing: You print the top and base separately, insert a standard ball bearing (usually 608 type — 22mm OD, the kind used in fidget spinners) between them. Smoother rotation, longer lifespan, more load capacity. Requires pressing the bearing in (press fit — see Print #11).
Recommended settings:
- Layer height: 0.2mm (0.15mm for print-in-place models — higher precision)
- Infill: 20% for rack shelves, 40% for rotating base
- Walls: 3–4 perimeters
- Top/bottom layers: 4
- Supports: none (good spice rack models are designed support-free)
- Speed: 40–45mm/s for cylindrical sections to minimize vibration artifacts
What can go wrong:
- Print-in-place mechanism won't separate: the clearance printed too tight — try twisting firmly and evenly; if completely stuck, the tolerance is off for your printer (adjust and reprint)
- Vertical seam is very visible: normal for cylindrical prints — change seam position in slicer, or place the seam on the rear of the rack
- Base warps and doesn't sit flat: the large flat base is lifting — use brim (5–8mm), ensure bed is level and temperature is right
The bigger lesson: Print-in-place mechanisms prove something important: the printer can do the assembly work for you. Hinges, bearings, chains, living joints — all printable in one go if tolerances are right. The spice rack is a gentle introduction to this idea. Level 3 will push it further.
Ready to layer up? → Print #13: Drawer Divider: Measure Twice, Print Once